Tuesday, December 7, 2010

Project #3

 Analog vs. Digital

The idea behind this piece comes from my first project where I had painted acetates over a print giving a depth of perception. It turn out good and I was quite satisfied with the end result but I knew it could reach a whole different level is little modifications. The problem was the uncleanness within the clear plastic thus making it less transparent so I knew about this clear resin product which is basically a pouring medium onto any surface. Long story short, I was referred clear epoxy instead because this wouldn't chemically react to the ink on paper and doesn't shrink when drying. Therefore I took the store clerk's advice and went with the epoxy. Amazing result! This stuff works really well and gave me the exact appearance I wanted....  
 
This project is based on past memories and has stuck with me throughout my whole child hood. We called it "The Cabin" and my friends used to hang out here after school and weekend nights back in the high school days. The image shows a reconstruction of this Cabin and how it used to look compared to its present state now.


Here are the remains.


In addition to this piece, I had print another photograph taking with a 35mm camera dating from 5 years ago and I also poured some epoxy to give it a vintage appearance.


Here I built a frame using cardboard to hold the epoxy on top of the photo.


Now the next step is showcasing them at critique!

Monday, November 1, 2010

Project #2 ideas

The project to me will need a lot of movement/busyness for the viewers because there will be so much meaning behind the final print. The  idea is based upon THE TOWER OF BABEL and how the roots of technology actually has many different interpretations depending on the culture and the time era. When you think about the language in technology, I think about how many ways of seeing it from either the location you are on this planet and of course one specific time in from the past. Its interesting because how will this word be interpreted in the far future because right now I think the meaning will not change for another couple centuries. The evolution between the different meanings of technology changes when a major event happens. For instances, I find the the wheel was one of them, electricity and the internet but by then its scattered everywhere and people are now thinking more about the electronics within the computer shell for example. In the older days, lets say a horse buggy, the understanding people get out of this technology (at the time) is the mechanical view or the outside shell.

This might seem all hard to understand because I might not have a clear explanation of my idea but ill keep posting more.    

Tuesday, October 19, 2010

Welding helmet, process

         Hi just today I started on a brand new welding helmet and here are the steps I did, first, figuring it out the theme because I giving instructions to do what ever pleases me.


          My next step was to start sanding but first I'll let you in on my ideas for the design. Its a welders helmet so I will do burning sheet metal with a bit of flames coming out of holes and places.

         This project will take me around 5 hours including the whole hour of preparation work (sanding) prior to the airbrush paint. 

Sunday, October 17, 2010

Project #1 , details

After numerous idea suggestions, my project finally hit the right road. The whole analog and digital theme really had me thinking about my airbrush. The airbrush in the digital field is basically the copy of the real analog airbrush only quite different in materials and techniques. The photoshop tool called the airbrush is what I am talking about as for digital. The analog version is the real airbrush medium which is what I practice the most. Now the point of this project will be to use both versions of the airbrush tool to produce one print of 20 by 29 inches.

The difficult task here is to combine both the digital and the analog airbrush together. Therefore I will use acetates to replicate the layers in a photoshop document. So first before I jump ahead of myself which I thinking I'm already doing, I will explain the process and idea. I used my pen tablet to draw (with the photoshop airbrush tool) a helmet design which actually was my first goalie helmet I airbrush. This drawing means a lot to me but not as for the character, but the helmet job itself because it really kick started a new and growing market for my airbrush paint jobs. Anyways so this drawing is the Goldorak character which origins from Japon in 1975. The process was the most interesting because they are quite similar but very different in the materials. The digital airbrush can be erased by a click of a button but not the real analog airbrush. The build up was almost identical (technique wise) because I was able to use the same techniques which was drawing the outline and doing color by color. The outcome is very different in the end when I compare the helmet to my print. The digital version still looks very computerized maybe because I am so used to seeing the real airbrush finish look prior to clear coat. Now with the acetates over the print, it gave it that layer of glossy film protectiveness. Very similar to the clear coat on the helmet. My next step was to airbrush these acetate layers to modify the colors and effect it gives over the print. One problem I had was making sure these acetates were not getting damaged in the process because any scratches or dirtiness would be visible in the end.

The outcome is very unique and thats what I love to do in my projects. I have to refer to David Spriggs work at Uqam this past month. It was composed of different layering of prints on acetates to give a 3D look and an awesome end result. Lighting is key in his work which I must try with mine tomorrow when I expose my work. I am looking forward to critique tomorrow to see what my classmates and teacher have to say about my work. I will take pictures and post!!! very soon!! 

Wednesday, September 15, 2010

Goalie helmets


S10 FOR SALE with FLAMES!!!

    This truck is my first ever truck or car paint job! Im very proud but unfortunately I must sell it in order to invest into a nicer project. I spent a lot of hours doing the body work with my brother but it was all worth the experience. To give you an example here's the before picture: 


   After many hours of sand blasting and rust grinding we manage to bring back the dead. Only this time, with some flames straight out of hell :O


    Using a stencil technique I learned from the internet, layer after layer these flames came out almost real looking.
        I stenciled in the letters which are embossed on the tail gate then went right over with my airbrush. I removed the masking and the letters popped back out. 


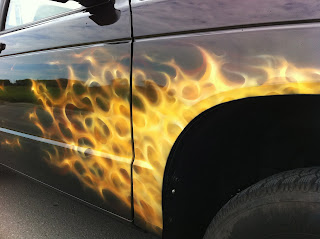
    I wish I had more time in the paint booth but I didn't because we only had 5 hours to paint in the paint boot. It took me 4 hours to all these flames not bad for the first time. Next time I'll put 6 or 7 hours and paint the whole front end!